By Helen Moore of Whitewood and Linen
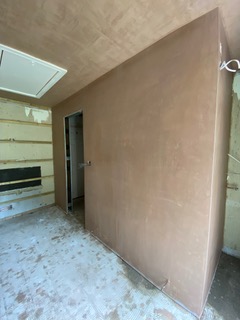
There has been a great deal of renovation work going on in our home of late. One area we reconfigured was a large and dismal old bathroom, turning it instead into two much needed rooms: a utility and separate washroom. We added a stud wall and I had big ideas for the utility room side of this wall, as I was keen to create a fancy coat rail statement piece to hang all our day-to-day coats and hats on. As avid (dog) walkers, we appear to have amassed quite a collection over the years!

In my mind, I knew how the finished wall should look. I wanted it to be in keeping with the overall rustic, country theme of our home and, unusually for me, I was prepared to be a little braver in my colour choice this time. Rather than stick with my usual, and perhaps more predictable, muted greys and off-whites, I wanted to go bold.

Why Lick Paint?
For this project, I was drawn to Lick, which seemed to fulfil my need to find a paint company offering a more sustainable choice of products. Lick is committed to doing its bit for our planet by partnering with ‘4ocean’, which helps to remove plastic from our seas, and with ‘One Tree Planted’, which helps to restore forests by planting trees. Lick claims that for every 2.5 litre tin of paint sold, ‘4ocean’ will remove 18g of plastic from our oceans – that’s the equivalent of two plastic bottles. You can find out more about Lick’s sustainability pledges by visiting their website here.
I requested their useful peel-and-stick paint samples, initially in several shades of green to try out my colour choices, before finally settling on a 2.5 litre tin of their pigment rich No 6 Dark Holly Green, in a water based eggshell finish. This room will see a lot of human and four-legged traffic and for me it was important whatever colour I settled on; it came in a durable finish too.
Equipment List
2.5 litres Lick No 6 Dark Holly Green paint – eggshell finish
Paint brush
Small paint roller


How to paint a wall with Lick Paint:
Step 1
The stud wall was plastered and painted in white ahead of this project. Prior to repainting, the radiator was drained of water and removed.


Step 2
A paint brush was used to cut-in around the corners of the walls and along skirtings and ceilings and then paint was applied using a small roller to ensure minimum streaks. No 6 is a very dark shade and we wanted to be absolutely sure of no unnecessary stripes and achieve an even coverage, so four coats of paint were applied, allowing four hours drying time in between.


Step 3
Once the wall was completely dry, the radiator was fixed back in place.
Step 4
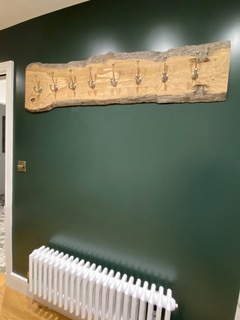
I also left it a good few days before hanging our home-made coat rail and, of course, our outdoor clothing to just be extra sure the paint had dried.

Looking back
If I am honest, I became a little jittery as the dark paint was applied to the walls. Nevertheless, for a girl whose colour palette rarely amounts to little more than a whiter shade of pale, I couldn’t be happier with the outcome! The darker colour has resulted in the country charm I had always hoped for in this room and the addition of the homemade wooden coat rail complements the colour choice well.
We are a month or so in now with our fully functioning utility room, during which time we have brought in all sorts of weather, so I am pleased with the paints’ durability – so far so good. Any boot scuffs and muddy dog paw prints are easily wiped away with a damp cloth and I love the colour choice as much now as when I first saw the sample sticker.
Conclusion
If you are thinking of sprucing up a wall or room in your home, I recommend you try Lick paint. They have a range of finishes to suit most projects together with a wide selection of colours and, of course, all stored in a useful tin so if you don’t finish the product this time around, leftovers are kept fresh for your next project. And don’t forget, we love to see your home DIY projects, just add #doitwithcans on any social media posts you make!


