Bees, bugs and beetles are helpful visitors to your garden. Some insects can help to pollinate your plants, fruit trees and flowers to boost growth, while others eat destructive pests or break down organic matter to keep your garden healthy.
This ‘bug hotel’ project is a great way to attract more bugs into your garden by giving them a suitable place to live and makes good use of the metal cans from your recycling bin, which are upcycled to create little nooks for the insects to live in.
For your own project, you can create a bug hotel of any size and shape you like. If you have enough cans of the same size, you could make a triangle stack. Or, with a variety of different-sized cans you could create a spiral with the tallest in the middle reducing to the shortest at the outside of the swirl.
Plus, you can paint the cans in any colours you like. Perhaps you could make an arched rainbow of cans? Or you could choose colours that coordinate with the outdoor furniture in your garden for a cohesive look.
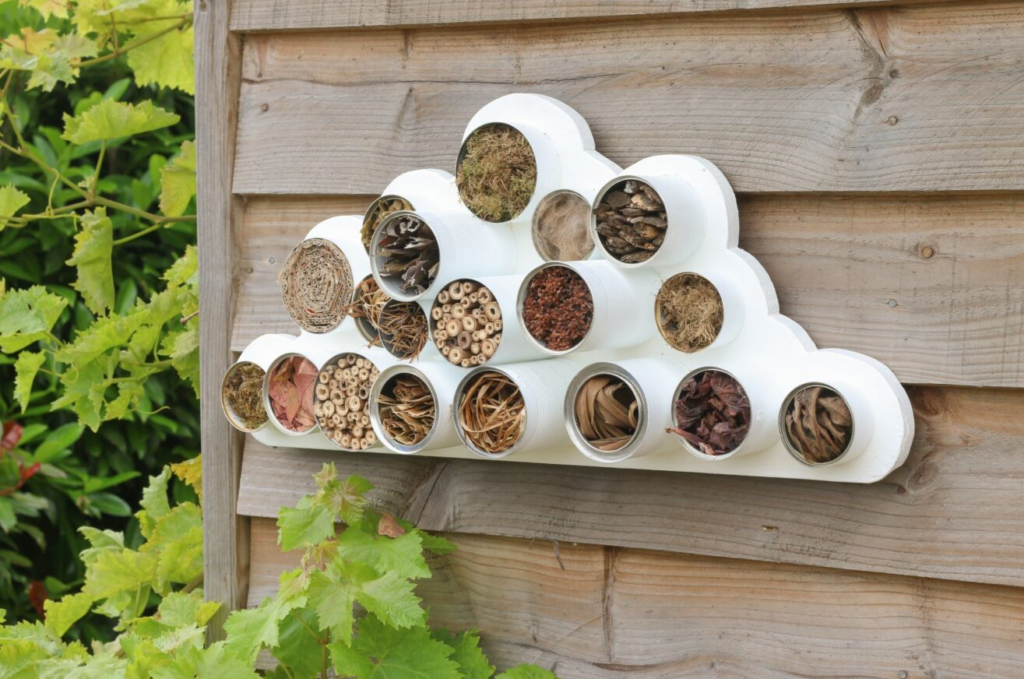
We’ve gone for a fun cloud-shaped bug hotel with white cans. We’ve left the interior of the cans in their original metal finish as a nod to ‘every cloud has a silver lining’ but have treated them with a clear topcoat to protect the metal.
We loved using metal cans for this project as it meant we could reuse old paint cans, food tins or metal tubs that were left over. Of course, you can easily recycle metal, as it’s a permanently available material, but giving the cans a new purpose that didn’t require any resources and energy consumption except our own elbow grease felt good. The metal cans felt like the right material to use due to their robust structure and their readymade shape being perfect for creating pockets of different environments.
Follow the step-by-step guide below if you fancy upcycling your metal cans in this fun and eco-conscious way.
You will need:
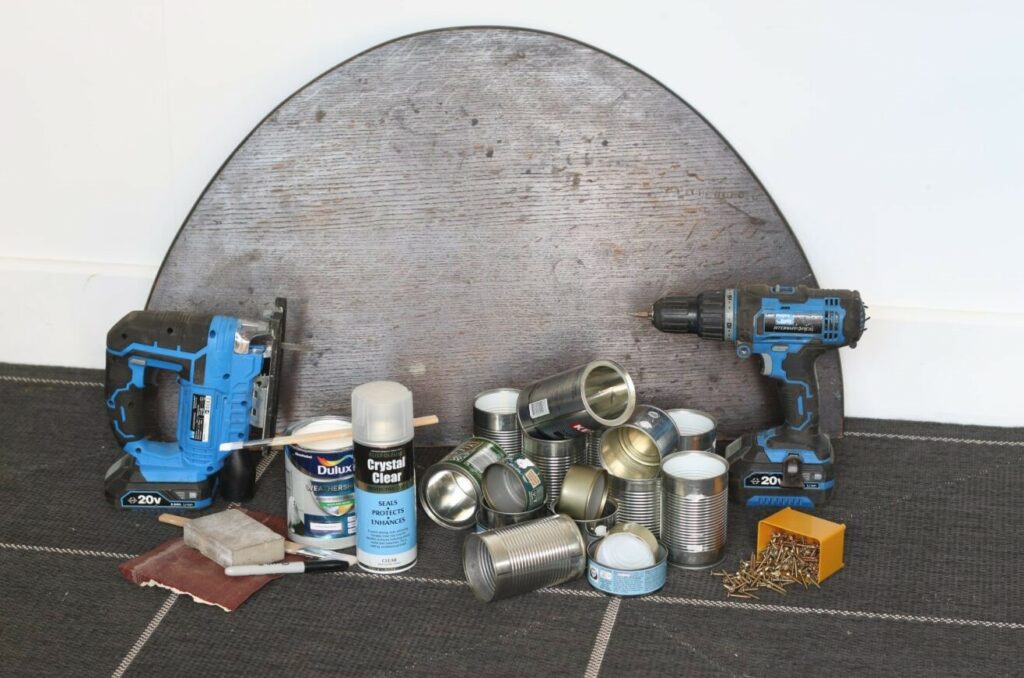
A variety of small metal cans, cleaned out
Timber board
Jig saw
A sander and sandpaper
Outdoor paint – we used Dulux Weathershield in Pure Brilliant White
Spray paint – we used Rust-Oleum Painter’s Touch in White Satin finish
Protective topcoat – we used Rust-Oleum’s Crystal Clear in Satin Gloss Clear finish
Screwdriver and wood screws
Suitable fixings for hanging the finished project
Step 1
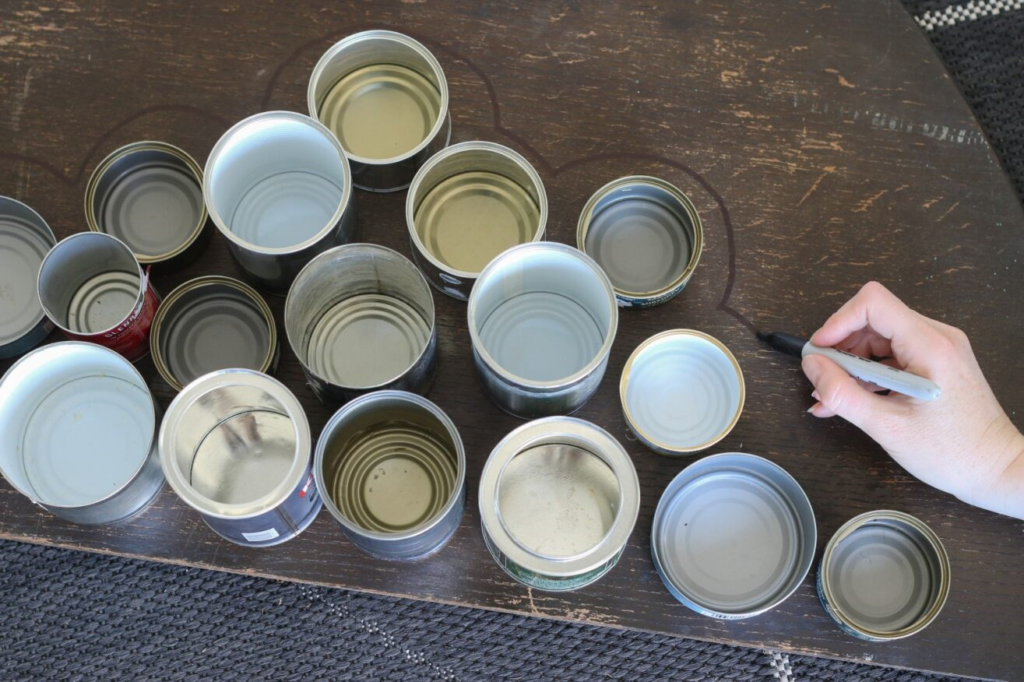
Collect a variety of metal cans to upcycle for your bug hotel project. Only use cans that have smooth, non-sharp edges to prevent cuts and injuries while you’re working on the project or replenishing the materials in the bug hotel in the future. We used small paint cans, coffee cans with peel-off tops and food cans that have been carefully opened without leaving any exposed, sharp edges. Clean the cans thoroughly, remove any labels and allow to dry.
Step 2
Position the cans on a piece of timber board. We upcycled the fold-out wooden leaf of an old dining table for this project but you could use any timber that is suitable for outdoor use. When you are happy with the shape the cans have formed, draw an outline around the cans, leaving at least an inch border around the edges – we created a cloud shape. Take a photo of the layout before removing the cans so that you can refer back to it to reposition the cans later.
Step 3
Use a jig saw to cut around the shapes you’ve drawn and then sand down all the edges until the wood is smooth with no splinters.

Step 4
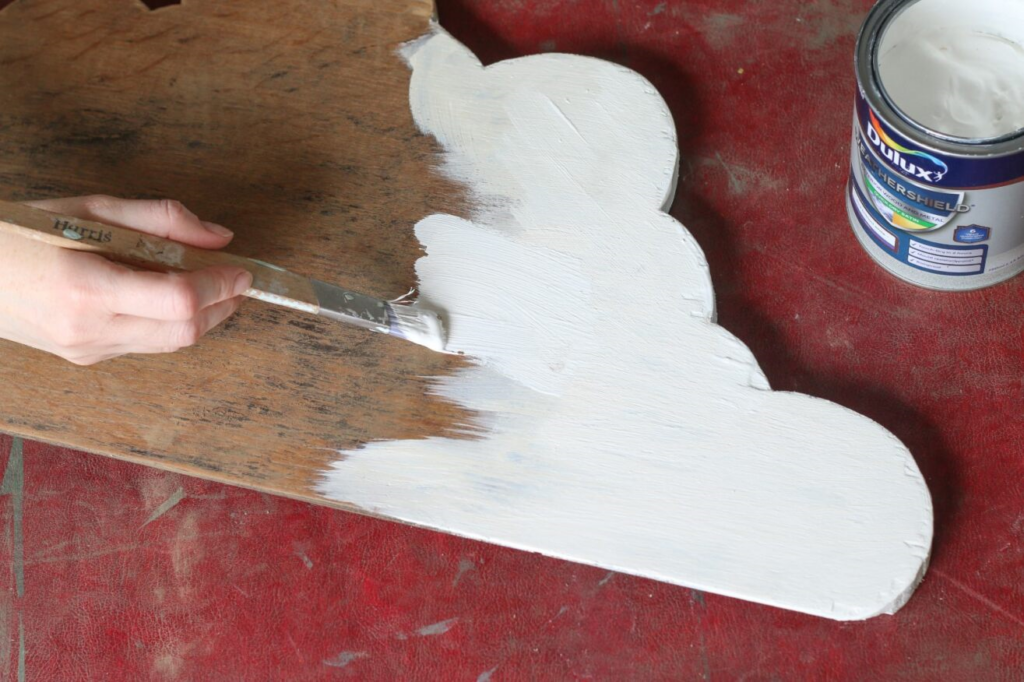
Paint the piece of wood with a paint that’s suitable for outdoor use. We chose Dulux Weathershield because it helps to provide all-weather protection for a range of exterior surfaces including masonry, metal and wood. Apply a couple of coats of the paint, allowing to fully dry between layers, until the wood is completely covered.
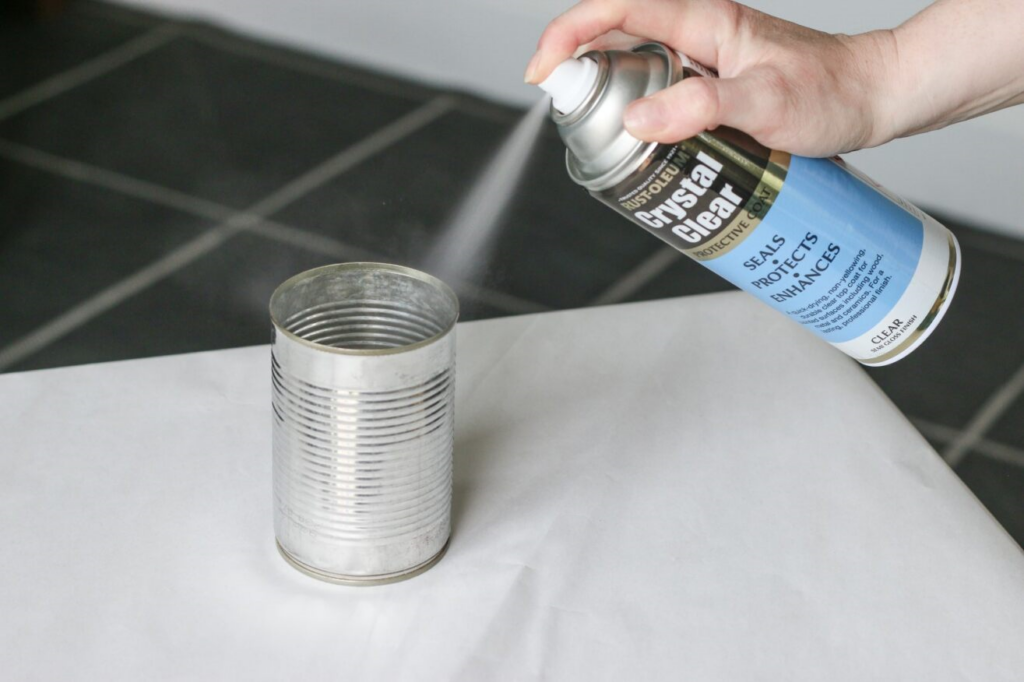
Step 5
To minimise rusting while the cans are outdoors, spray the inside of the cans with a clear protective topcoat to seal and protect the surface. Rust-Oleum’s Crystal Clear is ideal for this as it is suitable for use on wood, metal, plastics and ceramics and is a quick-drying, non-yellowing protective sealer.
Step 6
Spray paint the exterior of the cans to blend into the shape you’ve chosen seamlessly – we’ve gone for white cans on a white cloud-shaped background. You may need to do a few coats of spray paint to cover any print on the outside of the cans so use multiple fine layers of paint and allow it to completely dry between coats. We used Rust-Oleum’s Painter’s Touch spray paint, which is suitable for both indoor and outdoor use, and provides a protective finish.

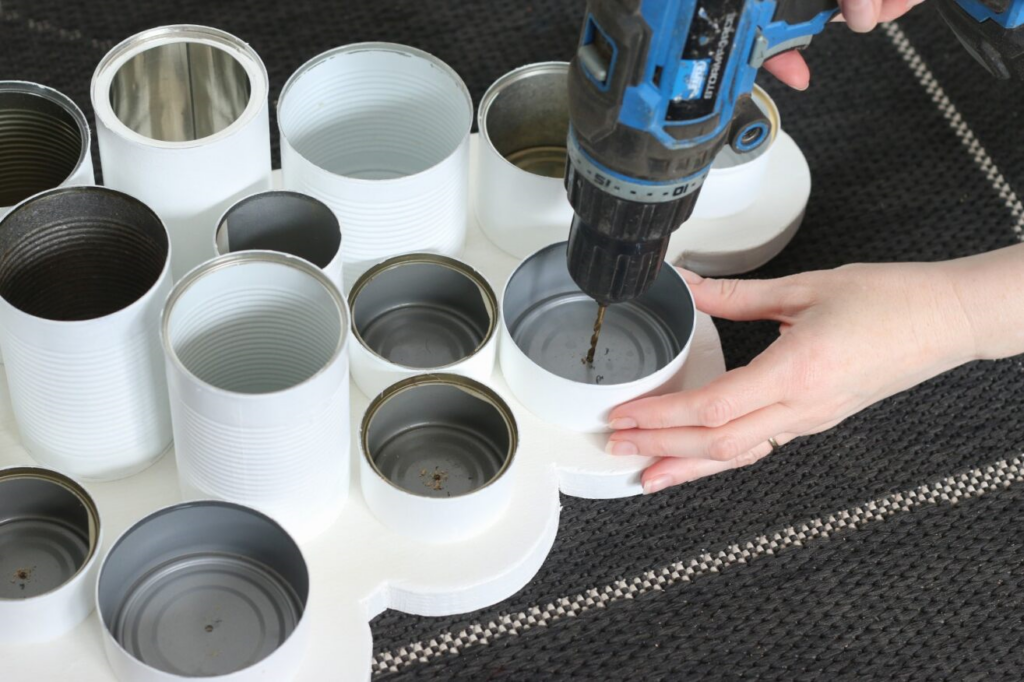
Step 7
Once all surfaces are dry, reposition the cans on the back board and use a small drill bit to pilot drill holes in the bases of the cans and into the wood. Use wood screws to attach the cans to the board.
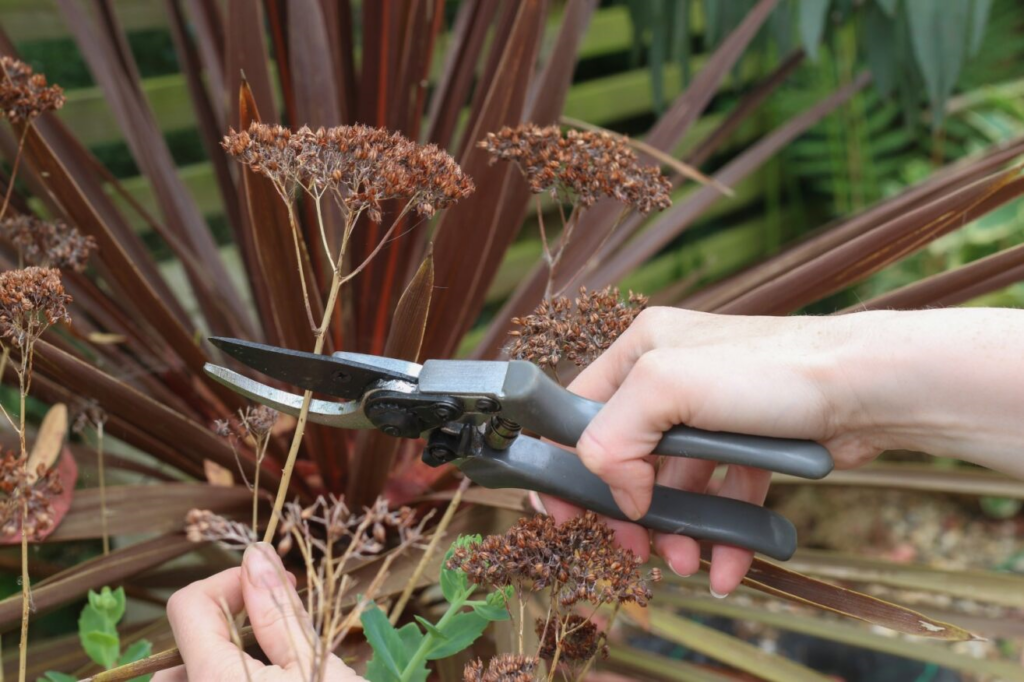
Step 8
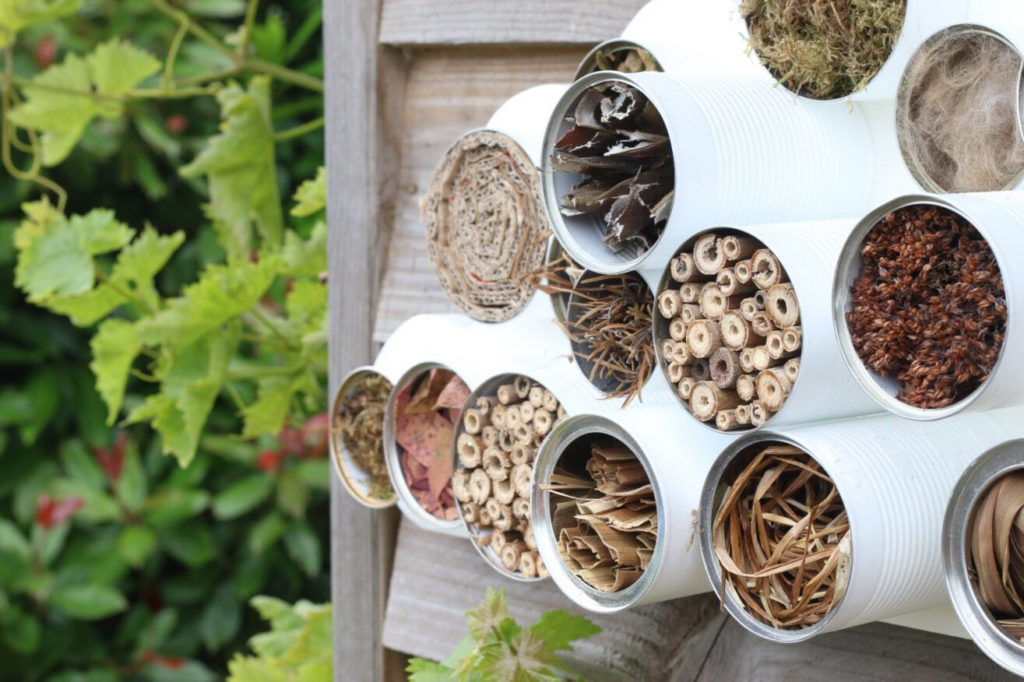
Use appropriate fixings to attach the bug hotel to a fence, trellis or wall of your garden. Then gather items to fill each of the cans to create lots of crevices and nooks for your bug hotel. We used seed heads, dried leaves, moss, bamboo stems, rolled-up cardboard, straw and bark.
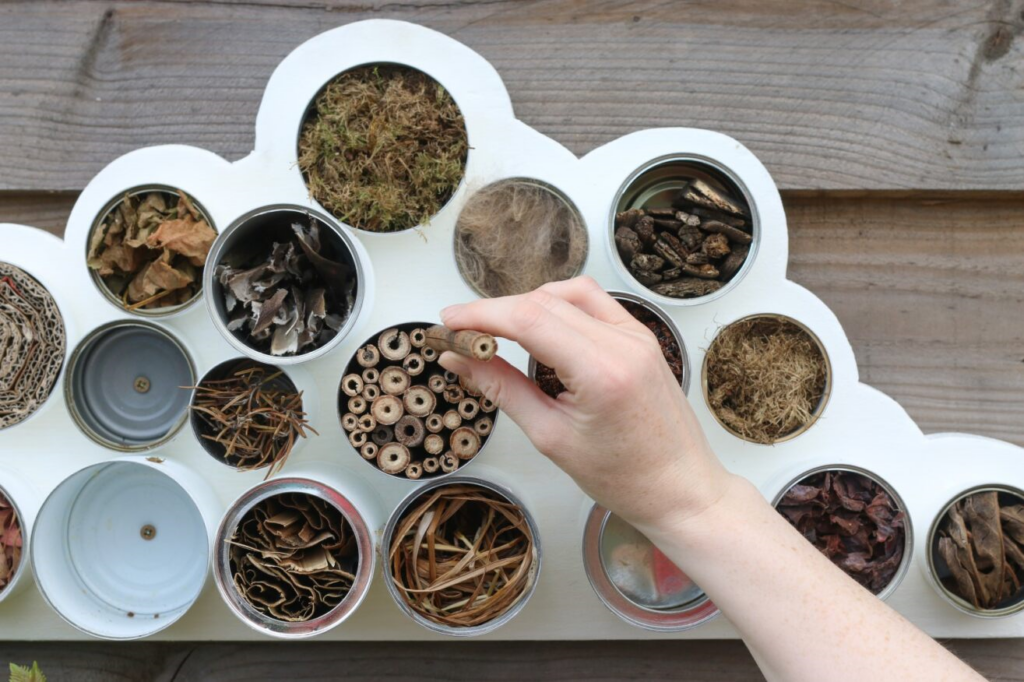
Now all you have to do is wait for the insects to move in! We had little bugs finding a new home in our cloud bug hotel straight away after they discovered the lovely habitat we’d provided for them. This project is a great way to upcycle metal cans and give them a new life in your garden as a home for insects.
The added bonus is that the cloud-shaped bug hotel looks rather fun in the garden so it’s attractive to children (be sure to install it out of reach so that they can’t touch the cans or bugs). It also provides a focal point for youngsters to keep an eye on the insects while learning about the benefits of attracting bugs into the garden.
Please take care while using tools, materials and equipment and all projects must be completed at your own risk. We do not take responsibility for any harm or injury that may occur. Be safe!
Project by My Thrifty Life by Cassie Fairy, Photography by Andy Greenacre
Check out ‘How to turn a pair of stools into a handy bench‘.


