Create a lovely spot for relaxing in your garden by revamping an old garden bench. We inherited a pair of cast-iron bench ends from a grandparent and, having been stored outside for decades, they were looking rather worse-for-wear, with flaking layers of old paint and plenty of rust.
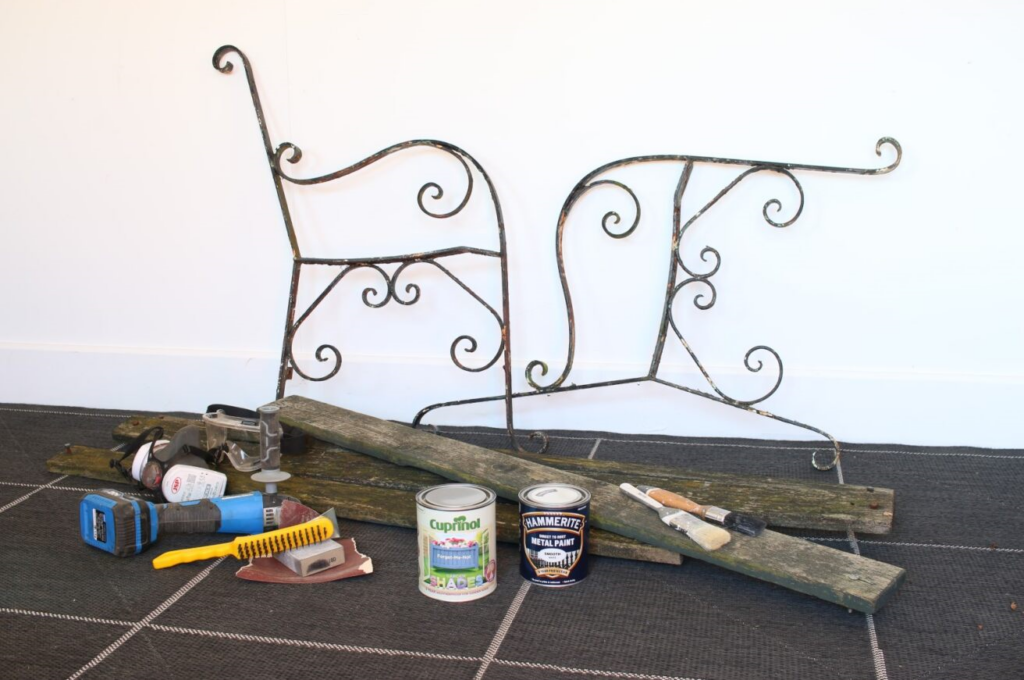
The seat planks were crumbling or missing and needed to be repaired or replaced. Nonetheless, the old cast-iron pieces had the potential to be reused and we decided to give them a refresh to use the bench in the garden this year.
For your own project..
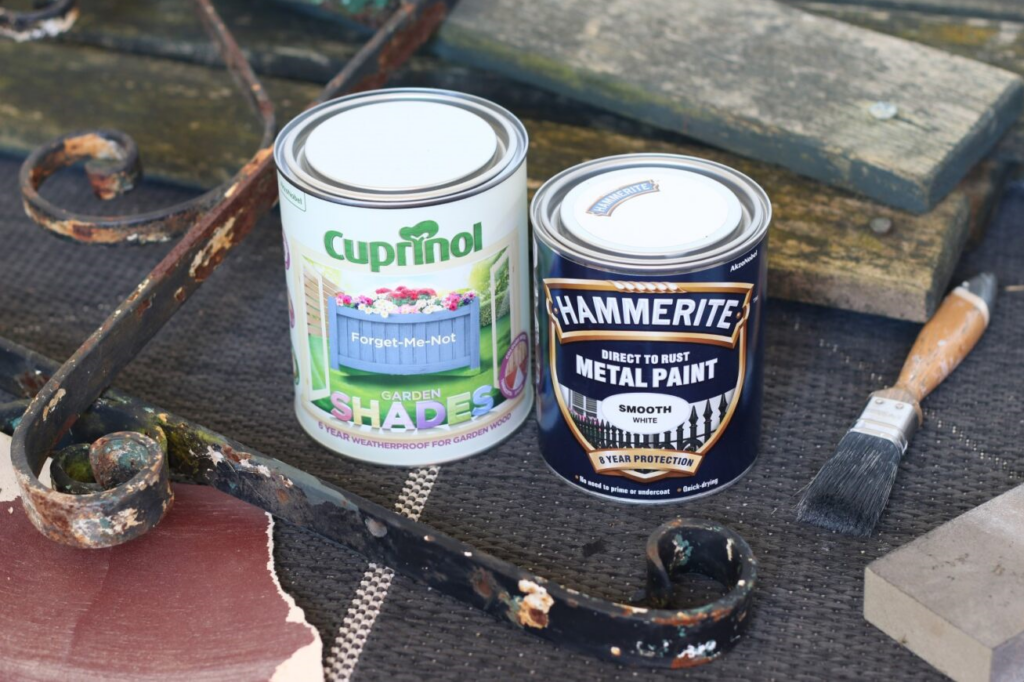
..you can create a colour combination to suit your taste, choosing any shade of Hammerite’s Direct to Rust paint from a selection of hammered, satin or smooth finishes. The wooden planks can be colour-matched to the cast iron ends or painted in a contrasting hue, like the Forget-Me-Not blue we’ve used. Alternatively, you could sand down the wood and give them a clear coat of weatherproof treatment to keep the natural woodgrain effect.
If you fancy upcycling an old garden bench with cast-iron ends, the step-by-step guide below will show you how we did it.
You will need:
- Old cast iron bench ends
- Reclaimed timber planks for the seat and back – we used old pallet wood
- Protective goggles, mask and gloves
- Saw
- Sanding block, sandpaper and an electric sander
- Wire brush
- Paint brushes
- Drill with metal and wood drill bits to fit the holes in the cast iron bench ends
- Nuts and coach bolts with smooth cup heads to fit into the holes in the cast iron bench ends
- Cuprinol Garden Shades paint – we used Forget-Me-Not
- Hammerite Direct to Rust metal paint – we used Smooth White
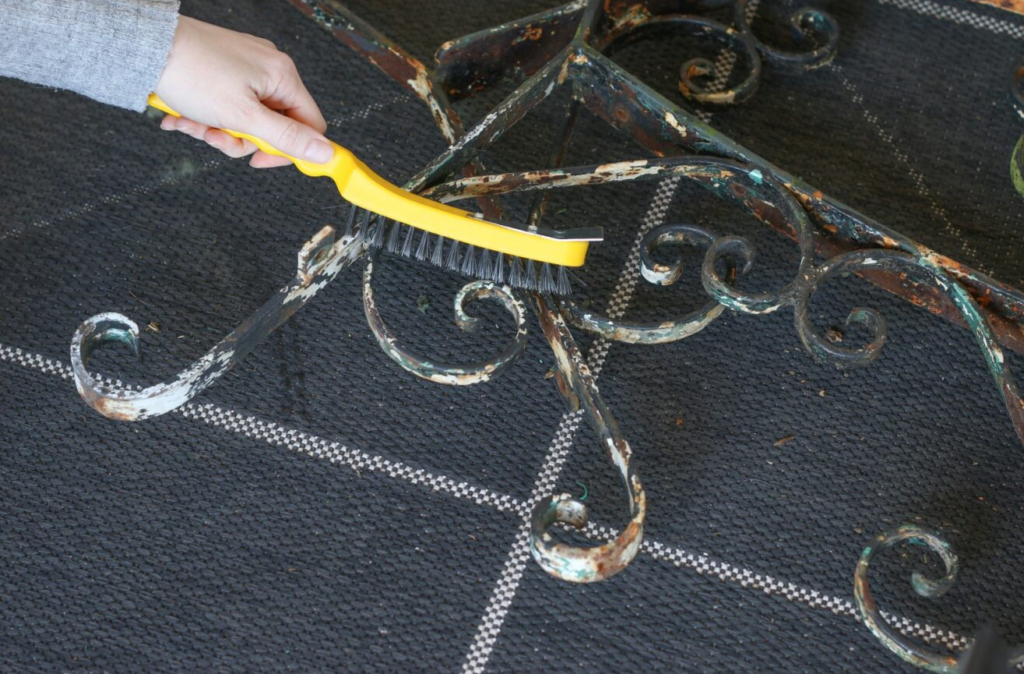
Step 1
Put on protective goggles, gloves and a mask before beginning this project. Remove any old bolts or any pieces of wood that are still attached to the bench ends. Then give the cast-iron ends a brush over with a wire brush to remove any flaking paint or loose rust.
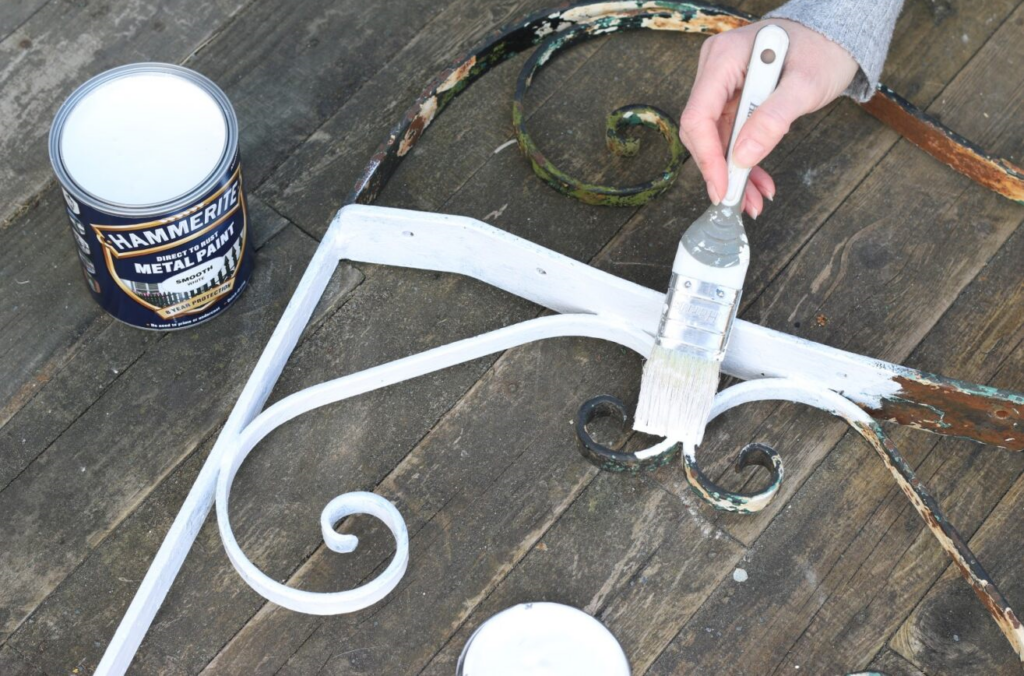
Step 2
Use a small paint brush to apply a coat of Hammerite Direct to Rust metal paint to the cast-iron ends. This is a durable, corrosion resistant paint for ferrous metals and it doesn’t require an undercoat or primer. (If you would like a paint that is for ferrous and non-ferrous metals then there is Hammerite Ultima.) Allow the first coat of paint to dry according to the instructions on the product. If needed, add further coats of paint to get the desired coverage – we used three coats of paint to cover the dark colour that was already on our bench ends.
Step 3
While the paint on the ends is drying, you can start to prepare the wooden planks for the seat. Again, wearing protective goggles, mask and gloves, carefully use a saw to cut pieces of reclaimed wood to the length that you want the bench to be.
With cast-iron bench ends, you could use short pieces of wood to make an armchair sized seat or use longer pieces for a two-person bench, provided the wood is strong enough to support the weight of two people.
Step 4
Drill holes into the ends of the timber planks to match up with the holes in the cast-iron bench ends. Then use an electric sander or sanding block to smooth down the wood and remove any splinters or rough patches so the planks will be safe to sit on. Wipe away any dust.
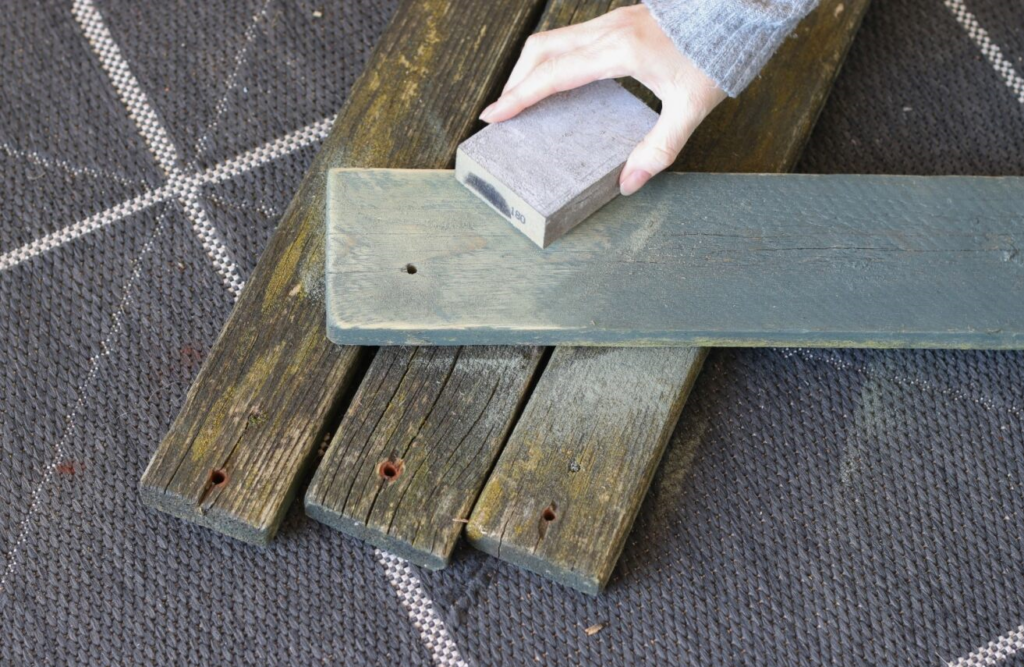
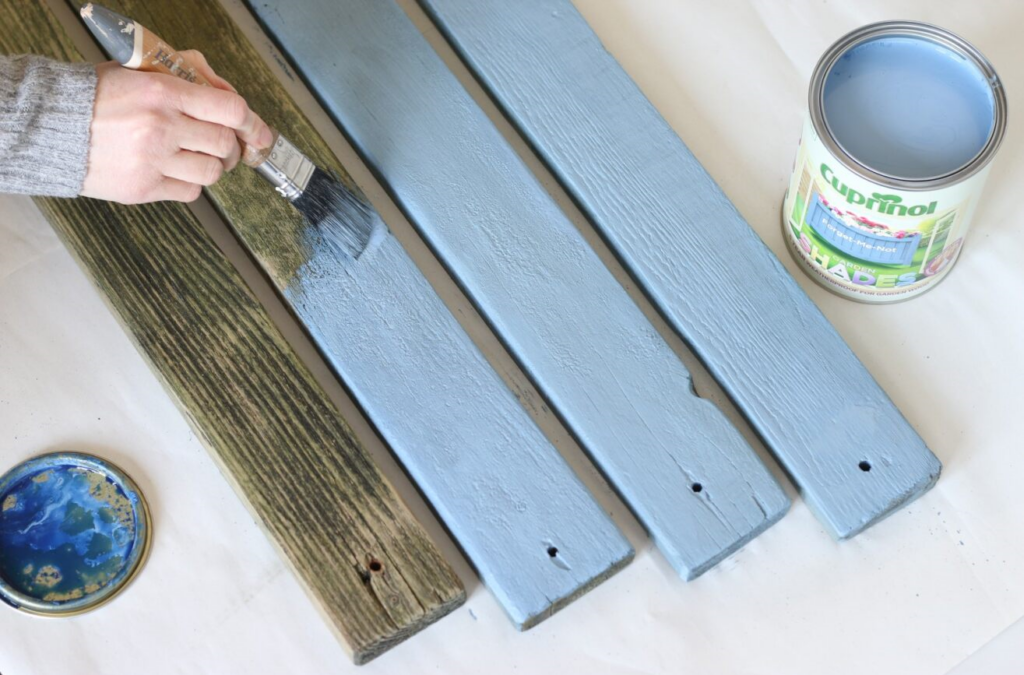
Step 5
Paint the planks on all sides using a paint that’s suitable for outdoor use. We used Cuprinol Garden Shades, which is especially developed to protect sheds, fences and other garden wood. You may need to use multiple coats of paint to achieve the desired depth of colour, so allow drying time between each coat of paint. If using resinous wood, please use an appropriate blocking primer prior to application of Garden Shades.
I chose to use paint that comes in metal cans for this project because I understand that metal is formally accredited as a permanently available material and is therefore endlessly recyclable. Once you’ve used up the paint, you can easily clean out any residue and use the empty can for handy storage, upcycle it to create another project or recycle it.
Step 6
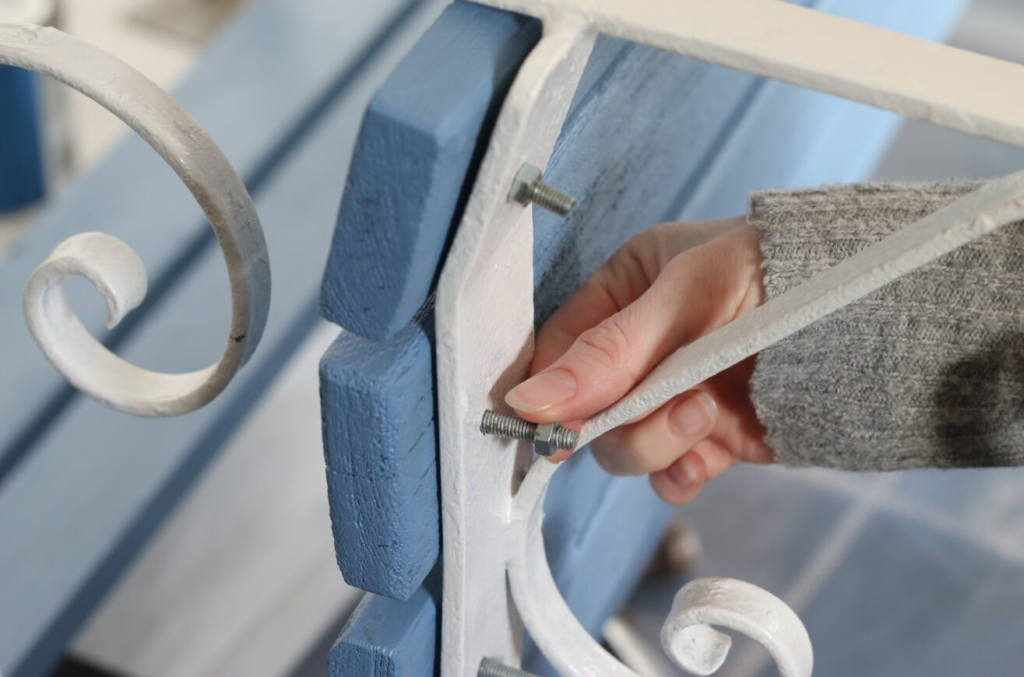
Once the paint on the cast iron ends and the seat planks is completely dry, you can attach the wooden planks to the bench top. Line up the holes in the wood with the holes in the bench ends and position a coach bolt with a smooth cup head through each hole. Use nuts on the underside and tighten to secure the seat planks in place.
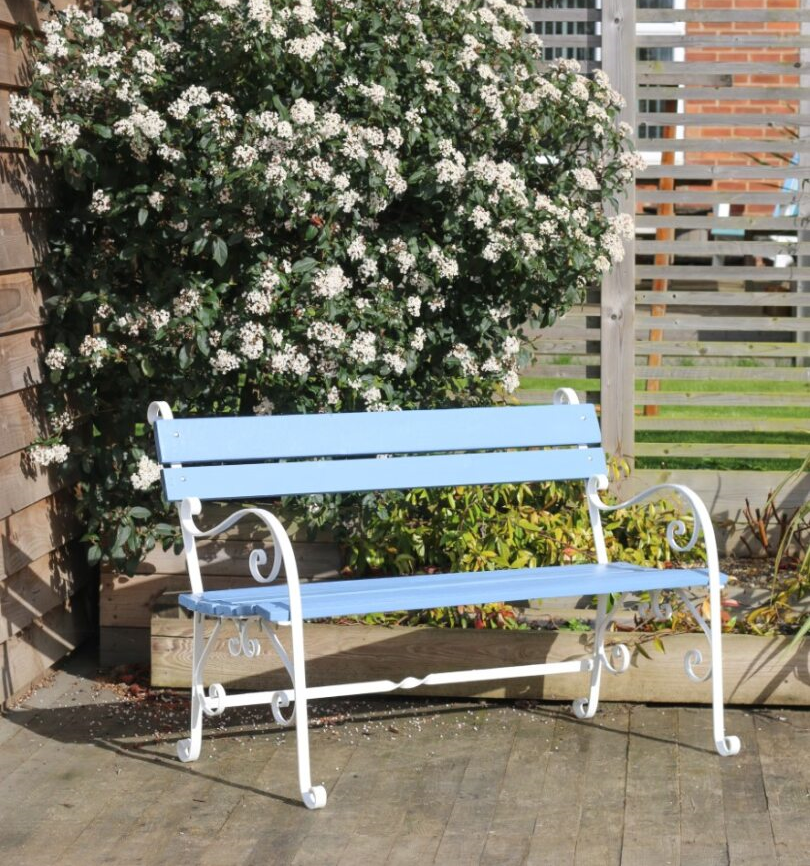
Now simply position your garden bench in a peaceful spot to enjoy a relaxing time in your garden or courtyard this summer. If you keep hold of the leftover paint, you can easily refresh the garden bench over the winter with a fresh coat of paint to make it look as good as new each spring. Metal containers are strong and robust so will help to protect the paint during storage.
Please take care while using tools, materials and equipment and all projects must be completed at your own risk. We do not take responsibility for any harm or injury that may occur. Be safe!
Project by My Thrifty Life by Cassie Fairy, Photography by Andy Greenacre
Check out how to How to DIY a Bug Hotel from Cans.


